4
To advance HW mode, press ADV once.
To advance CH mode, press ADV twice.
When a channel is ‘advanced’ the symbol appears at the bottom right of the display, and the channel number
will change to on (or off).
PERMANENT ON
Right switch must be in the RUN position.
Set left slide switch to
I.
For permanent HW demand, press ADV once
For permanent CH demand, press ADV twice.
The channel number will flash for 3 seconds and then stay on.
To cancel, set left slide switch back to AUTO
PERMANENT OFF
Right switch must be in the RUN position.
Set left slide switch to
O.
For permanent HW off, press ADV once
For permanent CH off, press ADV twice.
When set to permanent off, the selected channel will permanently flash.
To cancel, set left slide switch back to AUTO
RESET
In case of confusion or errors, the programmer can be completely reset by pressing the Reset
button with a small implement such as a biro
The right switch must be in the RUN position.
The display will flash zeros and the programme times will reset to their standard times.
Start again at section ‘To Set Present Time and Day’.
HELPFUL HINTS
● Channel 1 is DHW, channel 2 is CH.
● If you get stuck whilst programming, set right switch to RUN then back to DHW (or CH)
● An ‘odd’ programme step number is always the ON time.
An ‘even’ programme step number is always the corresponding OFF time.
● For every odd number (on time) the corresponding even number (off time) must use the
same day(s).
1
Gas Safety (Installation and Use) Regulations 1998: All gas appliances must be installed
by a competent person, in accordance with the above regulations. Failure to install the
appliance correctly could lead to prosecution. The manufacturers notes must not be
taken, in any way, as overriding statutory obligations.
IMPORTANT: Read these instructions carefully in order to get the best from your appliance.
WA R N I N G : This appliance must be earthed and protected by a 3A fuse if a 13A plug is used,
or, if any other type of plug is used, by a 5A fuse either in the plug or adaptor or at the
distribution board.
5 day/2 day (simple setting) or multiday (full function setting) twin channel digital programmer.
The HW and CH channels can be set independently.
Integral lithium battery provides 5 year back up in case of mains failure.
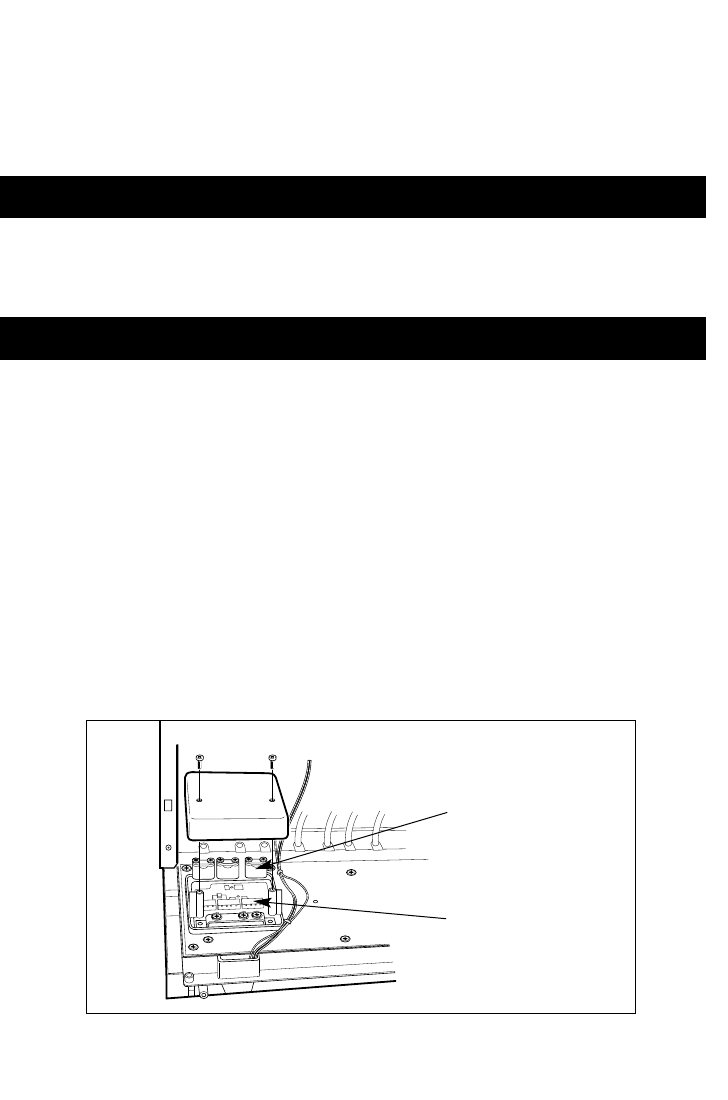
Before starting work, turn off the mains electricity supply to the appliance.
Remove the front panel from the appliance by sliding it upwards to clear the locating pegs and
securing clips.
Remove the three screws securing the bottom panel to the fascia.
Remove the two screws securing the fascia assembly to the appliance and lower it forwards to
the servicing position.
Remove the programmer blanking plate from the front of the fascia by carefully releasing the
clips at the rear right-hand side and withdrawing the plate from the front.
Feed the electrical lead from the programmer through the fascia to exit directly underneath it
and fit the programmer by hooking the top two lugs up into the facia slots and then push the
bottom two clips until they snap into position.
From the rear of the fascia, remove the plastic splash cover to reveal the electrical connection
box and remove the two screws securing the cover to the box.
Secure the cable from the programmer using the clamping positions on the underside of the
fascia and the rear of the electrical connection box and plug the cable into the corresponding
five-way socket on the rear of the fascia.
Replace the electrical box cover, splash cover and fascia bottom panel, and secure the fascia
using the two screws and refit the front panel.
PROGRAMMER
TO FIT THE PROGRAMMER
Clamp cable here
Connect plug from
timeswitch here
Fig. 1.

 (80 pages)
 (22 pages)
 (204 pages)
 Manymanuals.com
 Manymanuals.de
 Manymanuals.fr
 Manymanuals.it
 Manymanuals.pl
 Manymanuals.cz
 Manymanuals.es
 Manymanuals-pt.com
Comments to this Manuals