Bosch GKS 160 Operations Instructions Page 20
- Page / 245
- Table of contents
- BOOKMARKS
- PROFESSIONAL 1
- 2 1 609 929 J94 • 6.11.06 2
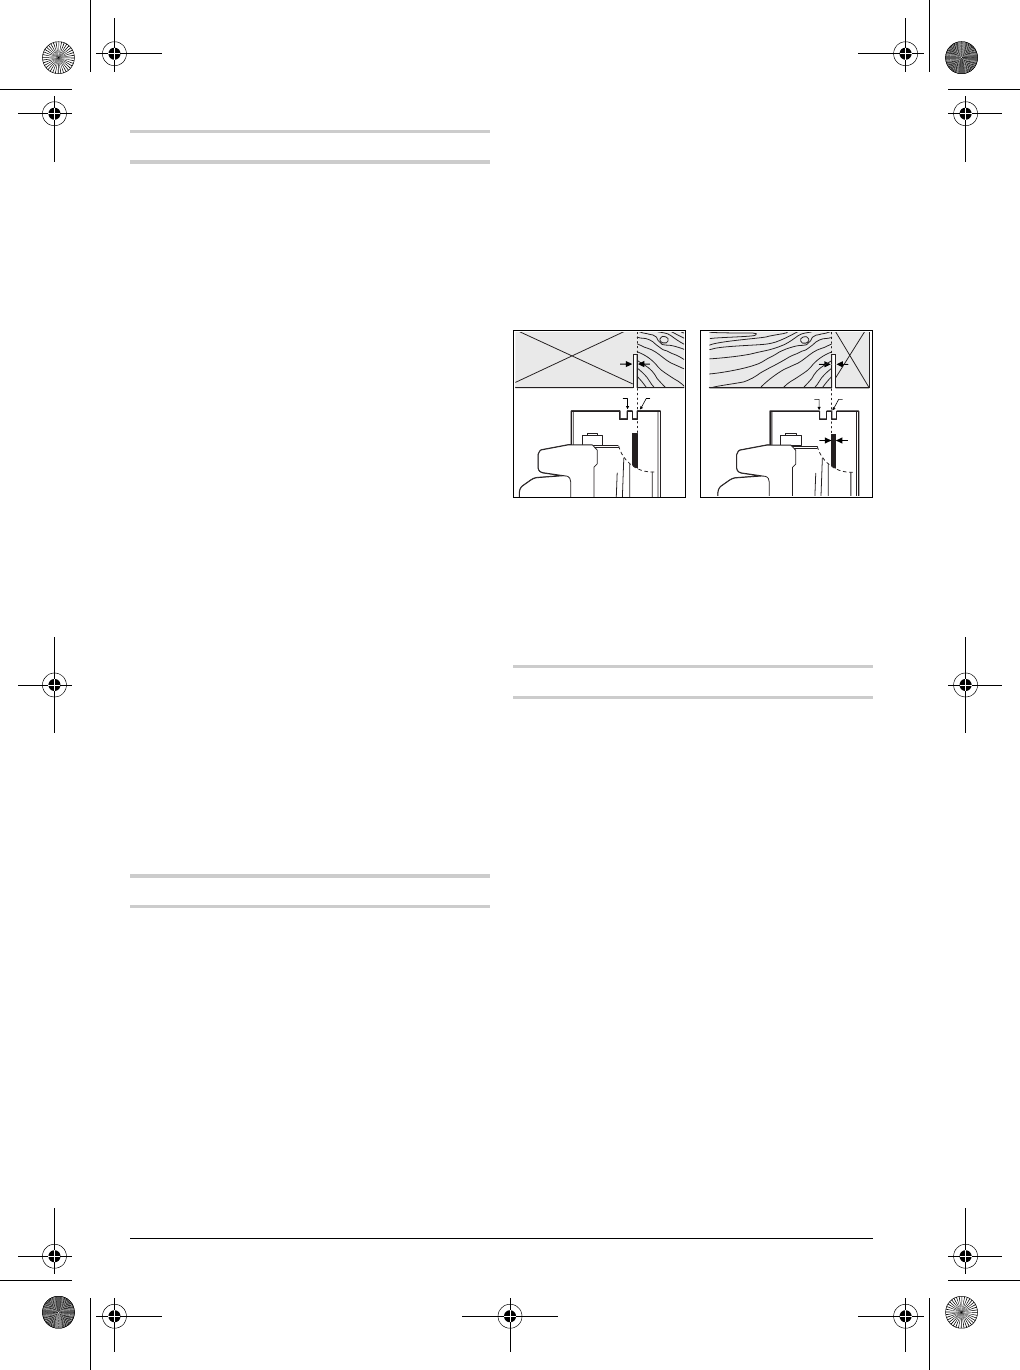
- 2,5 - 5 mm 4
- 1 609 929 J94 • 6.11.065 5
- Allgemeine Sicherheitshin 6
- Gerätespezifische 7
- Sicherheitshinweise 7
- Funktionsbeschreibung 9
- Abgebildete Komponenten 10
- Technische Daten 10
- Konformitätserklärung 11
- Spaltkeil einstellen 11
- (siehe Bilder B–C) 11
- Staub-/Späneabsaugung 12
- Betriebsarten 12
- Inbetriebnahme 13
- Arbeitshinweise 13
- Wartung und Service 14
- General Power Tool Safety 15
- Warnings 15
- Machine-specific 16
- Safety Warnings 16
- Functional Description 18
- Assembly 19
- Operation 20
- Operating Instructions 21
- Maintenance and Service 22
- Indications générales 23
- Instructions de sécurité 24
- Description du 26
- Eléments de l’appareil 27
- Caractéristiques techniques 27
- Bruits et vibrations 27
- Déclaration de conformité 28
- Mise en marche 29
- Mise en service 30
- Instructions d’utilisation 30
- Entretien et service 31
- Service après-vente 32
- Elimination des déchets 32
- Advertencias de peligro 33
- Instrucciones de seguridad 34
- Descripción del 36
- Componentes principales 37
- Datos técnicos 37
- Información sobre ruidos y 37
- Declaración de conformidad 38
- Ajuste de la cuña separadora 38
- (ver figuras B–C) 38
- Operación 39
- Mantenimiento y servicio 41
- Indicações gerais de 42
- Instruções de serviço 43
- Descrição de funções 45
- Componentes ilustrados 46
- Dados técnicos 46
- Montagem 47
- Funcionamento 48
- Colocação em funcionamento 49
- Indicações de trabalho 49
- Manutenção e serviço 50
- Avvertenze generali di peri 51
- Istruzioni di sicurezza 52
- Descrizione del 55
- Montaggio 56
- (vedere figure B–C) 57
- Modi operativi 57
- Messa in funzione 58
- Indicazioni operative 58
- Manutenzione ed assistenza 59
- Algemene veiligheidswaar 60
- Gereedschapspecifieke 61
- Functiebeschrijving 63
- Afgebeelde componenten 64
- Technische gegevens 64
- Conformiteitsverklaring 65
- Spouwmes instellen 65
- (zie afbeeldingen B–C) 65
- Afzuiging van stof en spanen 66
- Functies 66
- Ingebruikneming 66
- Tips voor de werkzaamheden 67
- Onderhoud en service 68
- Generelle advarselshenvis 69
- Værktøjsspecifikke 70
- Funktionsbeskrivelse 72
- Montering 73
- Støv-/spånudsugning 74
- Funktioner 74
- Ibrugtagning 75
- Arbejdsvejledning 75
- Vedligeholdelse og service 76
- Allmänna säkerhetsanvis 77
- Verktygsspecifika 78
- Funktionsbeskrivning 80
- Försäkran om 81
- Inställning av klyvkil 81
- (se bilderna B – C) 81
- Damm-/spånutsugning 82
- Driftsätt 82
- Driftstart 82
- Arbetsanvisningar 83
- Underhåll och service 84
- Generelle advarsler for 85
- Maskinavhengig 86
- Funksjonsbeskrivelse 88
- Støv-/sponavsuging 90
- Driftstyper 90
- Igangsetting 90
- Arbeidshenvisninger 91
- Service og vedlikehold 92
- Sähkötyökalujen yleiset 93
- Laitekohtaiset turvallisuus 94
- Toimintaselostus 96
- Melu-/tärinätiedot 97
- Standardinmukaisuusvakuutus 97
- Sahanterän asennus/vaihto 97
- Halkaisukiilan säätö 97
- (katso kuvat B ja C) 97
- Pölyn ja lastun poistoimu 98
- Käyttömuodot 98
- Käyttöönotto 98
- Työskentelyohjeita 99
- Hoito ja huolto 100
- Γενικές προειδοποιητικές 101
- Ειδικές ως προς το 102
- 1 609 929 J94 • 6.11.06 103
- Περιγραφή λειτουργίας 105
- Συναρµολγηση 106
- Ρύθµιση της σφήνας 107
- (βλέπε εικνες B–C) 107
- Αναρρφηση 107
- Λειτουργία 108
- Υποδείξεις εργασίας 109
- Συντήρηση και Service 110
- Elektrikli El Aletleri İçin 111
- Genel Uyarı Talimatı 111
- Alete özgü güvenlik talimatı 112
- Fonksiyon tanımı 114
- Teknik veriler 115
- Gürültü/Titreşim bilgisi 115
- Uygunluk beyanı 115
- Daire testere bıçaklarının 115
- Yarma kamasının ayarlanması 116
- (Bakınız: Şekiller B–C) 116
- Toz ve talaş emme 116
- İşletim türleri 116
- Çalıştırma 117
- Bakım ve servis 118
- Ogólne przepisy bezpie 119
- Szczególne przepisy bez 120
- Opis funkcjonowania 122
- Deklaracja zgodności 124
- (patrz szkice B–C) 124
- Odsyssanie pyłów/wiórów 125
- Rodzaje pracy 125
- Uruchomienie 126
- Wskazówki dotyczące pracy 126
- Konserwacja i serwis 127
- Všeobecná varovná 128
- Podle typu stroje specifiko 129
- Funkční popis 131
- Technická data 132
- Informace o hluku a vibracích 132
- Prohlášení o shodě 132
- Nastavení rozpěrného klínu 133
- (viz obr. B–C) 133
- Odsávání prachu/třísek 133
- Druhy provozu 133
- Uvedení do provozu 134
- Pracovní pokyny 134
- Údržba a servis 135
- Všeobecné výstražné 136
- Bezpečnostné pokyny 137
- Popis fungovania 139
- Používanie poda určenia 140
- Vyobrazené komponenty 140
- Technické údaje 140
- Vyhlásenie o konformite 141
- Montáž/výmena pílového kotúča 141
- Nastavenie štrbinového klinu 141
- (pozri obrázky B–C) 141
- Prevádzka 142
- Uvedenie do prevádzky 143
- Pokyny na používanie 143
- Általános biztonsági 145
- A berendezéssel 146
- A működés leírása 149
- Összeszerelés 150
- Üzemeltetés 151
- Üzembe helyezés 152
- Munkavégzési tanácsok 152
- Karbantartás és szerviz 153
- Общие указания по 154
- Специфичные для 156
- Описание функции 158
- Заявление о соответствии 159
- Регулировка распорного клина 160
- (см. рис. В и С) 160
- Отсос пыли и стружки 160
- Работа с инструментом 161
- Указания по применению 162
- Техобслуживание и 163
- Загальні попередження 164
- Специфічні для приладу 165
- Опис принципу роботи 167
- Зображені компоненти 168
- Технічні дані 168
- Призначення приладу 168
- Заява про відповідність 169
- (див.мал.B–C) 169
- Відсмоктування 170
- Режими роботи 170
- Початок роботи 171
- Вказівки щодо роботи 171
- Технічне обслуговування і 172
- Indicaţii generale de averti 173
- Instrucţiuni privind 174
- Descrierea funcţionării 176
- Elemente componente 177
- Date tehnice 177
- Declaraţie de conformitate 178
- Reglarea penei de despicat 178
- (vezi figurile B–C) 178
- Funcţionare 179
- Punere în funcţiune 180
- Instrucţiuni de lucru 180
- Întreţinere și service 181
- Общи указания за 182
- Указания за безопасна 184
- Функционално описание 186
- Технически данни 187
- Информация за излъчван шум и 187
- Декларация за съответствие 187
- Монтиране 188
- Работа с 189
- Указания за работа 190
- Поддържане и сервиз 191
- Opšta upozorenja za 192
- Sigurnosna uputstva 193
- Opis funkcija 195
- Tehnički podaci 196
- Izjava o usaglašenosti 196
- Podešavanje klina za procep 197
- (pogledajte slike B–C) 197
- Usisavanje prašine/piljevine 197
- Vrste rada 197
- Puštanje u rad 198
- Uputstva za rad 198
- Održavanje i servis 199
- Splošna varnostna navodila 200
- Specifična varnostna 201
- Opis delovanja 203
- Tehnični podatki 204
- Podatki o hrupu/vibracijah 204
- Izjava o skladnosti 204
- Delovanje 205
- Navodila za delo 206
- Vzdrževanje in servisiranje 207
- Opće upute za sigurnost za 208
- Upute za sigurnost 209
- Opis djelovanja 211
- Izjava o usklađenosti 212
- Namještanje klina raspora 213
- (vidjeti slike B–C) 213
- Usisavanje prašine/strugotina 213
- Načini rada 213
- Upute za rad 214
- Održavanje i servisiranje 215
- Üldised ohutusjuhised 216
- Ohutusjuhised 217
- Tööpõhimõtte kirjeldus 219
- Vastavus normidele 220
- Lõikekiilu reguleerimine 221
- (vt jooniseid B–C) 221
- Tolmu/saepuru äratõmme 221
- Kasutusviisid 221
- Seadme kasutuselevõtt 222
- Tööjuhised 222
- Hooldus ja teenindus 223
- Vispārējie drošības 224
- Īpašie darba drošības 225
- Funkciju apraksts 228
- Salikšana 229
- Asmens īa iestiprināšana 230
- (skatīt attēlus B–C) 230
- Puteku un skaidu uzsūkšana 230
- Lietošana 231
- Apkalpošana un apkope 233
- Bendrosios darbo su 234
- Saugos nuorodos dirban 235
- Funkcijų aprašymas 237
- Techniniai duomenys 238
- Montavimas 239
- Naudojimas 240
- Priežiūra ir servisas 242
- 2431 609 929 J94 • 6.11.06 243
- VARIOCOR 244
- Robert Bosch GmbH 245
- Power Tools Division 245
- 70745 Leinfelden-Echterdingen 245
Related products and manuals for Circular saws Bosch GKS 160


 (213 pages)

 (44 pages)
(40 pages)
(1 pages)
(40 pages)
(29 pages)
(48 pages)
(4 pages)
(44 pages)
(44 pages)
(40 pages)
(1 pages)
(40 pages)
(29 pages)
(48 pages)
(4 pages)

 (151 pages)
(108 pages)
(44 pages)
(208 pages)
(15 pages)
(8 pages)
(151 pages)
(108 pages)
(44 pages)
(208 pages)
(15 pages)
(8 pages)
© 2020, manymanuals.com. All rights reserved. | 1.003 s |
 Manymanuals.com
 Manymanuals.de
 Manymanuals.fr
 Manymanuals.it
 Manymanuals.pl
 Manymanuals.cz
 Manymanuals.es
 Manymanuals-pt.com
Comments to this Manuals